HOW TO CLEAN NPM CACHE IN WINDOWS: BEGINNER'S GUIDE
Learn how to clean npm cache in Windows with our step-by-step guide. Optimize your Node.js environment and enhance performance easily. #NPM #Windows

INTRODUCTION:
Have you ever noticed that your computer takes a little longer than usual to load npm packages? This could be attributed to a cluttered npm cache. The npm cache, like the cache on your phone, holds temporary data to expedite installations. However, occasionally, this data may get outdated or corrupted, leading to delays or setup errors. Often, a simple solution such as cleaning the npm cache can fix a lot of common problems. We'll take you step-by-step through the process of cleaning the npm cache on your Windows computer in this article.
Understanding NPM Cache:
The downloaded packages are stored by the NPM (Node Package Manager) cache on your system, which helps to expedite the next installations and updates. However, over time, this cache may accumulate unnecessary files or get compromised, leading to unanticipated errors during package installations or upgrades. Regularly cleaning the npm cache can fix these problems and ensure that npm runs without hiccups.
Step-by-Step Guide: Clearing NPM Cache in Windows
Follow these simple instructions to clean the Windows computer's npm cache:
What You Will Need:
• A PC running Windows
• Availability of a Command Prompt window.
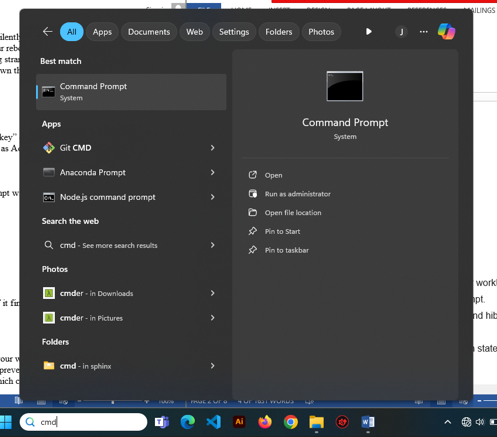
First Step: Open Command Prompt:
• Click the Start menu and search for "Command Prompt".
• Choose "Run as administrator" when you right-click on "Command Prompt" to grant the application more permission to modify records.
Step 2: Enter the Command:
Type the following command in the Command Prompt window and hit Enter:
'''
npm cache clean --force
'''

The --force option ensures a complete cleanup, even of stubborn files.
Step 3: Await for the process to complete
Pressing Enter will cause npm to start cleaning the cache. This preparation could take several minutes, depending on how big the cache is estimated to be. Hold off until the Command Prompt returns to the default command prompt line.
Step 4: Verify Cache Clearance
You can type the following command and hit Enter to ensure that the cache has been successfully cleared:
'''
npm cache verify
'''
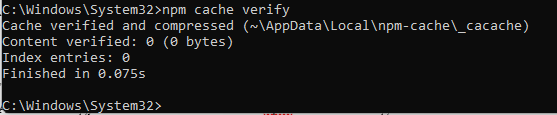
After clearing, this command verifies the npm cache's integrity.
If everything is OK, you will see a notification that says something like "Cache verified".
Step 5: Exit Command Prompt
You can exit the Command Prompt window by writing "exit" and pressing Enter, which is equivalent to clicking the close button in the top-right corner of the window after you've verified that the cache has been emptied.
Why should we clean the npm cache?
There are several explanations for maintaining a clear npm cache:
• Improved performance: Cluttered caches can slow down package installations. Things can function more smoothly if it is cleaned up.
• Resolving installation errors: In certain situations, outdated or tampered cache data can result in installation errors. Clearing the cache can help resolve these problems.
• Fresh Starts: Cleaning the cache makes sure you're introducing the most recent and correct package versions especially if you're working on a new project or experiencing problems.
Thus, the next time your npm installations seem unresponsive, don't hesitate to give your cache a refresh!
For Novices:
• Although Command Prompt may seem frightening, don't worry! Just copy and paste the aforementioned commands.
• Although the –force option may seem aggressive, it is a safe way to clear the cache.
Following these easy steps will ensure that your npm cache stays clear and that your Windows coding projects run well.
CONCLUSION:
On a Windows computer, clearing the npm cache is a simple yet effective troubleshooting step that can help fix a variety of npm-related problems. Indeed you can ensure that npm packages operate well on your system by following the guide provided in this article. Thus, do not hesitate to try clearing the cache the next time you run into npm errors or execution problems!
Thanks for reading.
If you like the article, consider sharing and subscribing. ;)